Monday, December 15, 2014

Postcards


Kate Postcard

For the Kate postcard, I chose four pictures that describe me. I also used a clipping mask to insert the pictures into the text, I learned how to format pictures so that they look good with a final product. I wan to explore more using the clipping mask tool.

Winter Wonderland/Holidays Postcard


I created a Winter Wonderland Postcard and Holidays Postcard because Winter is my favorite time of year! I chose pictures from morguefiles and arranged them in Photoshop to create the final product. I adjusted the opacity of the snowflake to make it blend in more. I also cropped the leaves and placed them on either side of the photo.


My Brand


I am developing my story with images by including patterns and pictures that represent my personality. For example, in my 'KATE' postcard, I used a picture of the ocean because I love travelling and being active. I included the pattern on the T because it is very bright and fun, which is how I want my brand to be. When others think of me, I hope they picture a sensual individual who exceeds their expectations and also has the creative edge to do so.

Wednesday, December 3, 2014

Scribble Tutorial

I did the Scribble tutorial using Adobe Illustrator. It was fairly simple to create. I first added a new fill and made it black. Then, I stylized the fill to scribble. After doing this, I added to the roughness and thickness of the scribble. Then, I saved it as a Graphics Style so that I will be able to use it again!

The tutorial site can be found here: http://vectips.com/tutorials/turn-any-font-into-a-sketch-font/

Monday, December 1, 2014

Believe It or Not?

What was the intent in creating this website?

The goal in completing this project was to display the ability to create a website with multiple pages. We were also given the chance to present our creativity with the styles that we linked to our website. Other tools were also utilized. Including the date tool used in the footer and the source code to link websites. 


How did I prepare?

Before creating this project, I looked over the possible "hoaxes" to get an idea of the material that I would be working with. I then set up my styles and outline for my website. I also viewed the videos on Edmodo and looked over the PDF files explaining how to complete the project. After this, it was time to begin! While creating the project, I kept the Edmodo videos and PDF files open. This made it very helpful to finish the project in a timely manner. After completing the project and ensuring that I had included all of the necessary information in my website, I revised the styles and fonts to better fit the theme of my overall website. 


What did I learn?

Over the course of this project, I learned many valuable pieces of information. First, I learned that you can enter a date in the footer by clicking Insert>Date. You can also link another website or document to your own website by using the source code. Here is an example of one of my sources: Source: <a href="http://www.snopes.com/computer/virus/virus.asp"target="_blank">Snopes – Virus Hoaxes &amp; Realities</a>. The last piece of information that I learned was how to input a picture into the side margin. You can do this using the following code: <img src="realorhoax_temporary_logo.png" alt="Logo" style="width:245px;height:215px">. 


How was this website created?

This website was made using software from the Adobe Suite known as Dreamweaver. In Dreamweaver, you are given many options regarding the type, size, and look of your website. My Hoax Website happens to be HTML 5, which is the latest form of HTML in Dreamweaver. 

How was collaboration used during this project?

For this project, there was not much that was needed to be done using collaboration. For the most part, it was done individually. Every once in a while, I would ask my classmate sitting next to me for an opinion on the styles. I managed my time and was able to complete the project on time. 


What would I do differently?

If I were to create this project again, I would make my own logo in Photoshop to give it a personal touch. I feel as though it is very important to express your personality through your creative work. I would not change the order and structure of my website because I am very pleased with the way that it is organized. It is simple and could be understood easily by a user. 

To make my next website even better, I will use the ability to place a picture in the side margin. I will also be able to create a table or "list," as it is called in the code, to link multiple HTML sites. I found a website called w3schools. It can be found using the following link: http://www.w3schools.com. This site is very helpful with a wide range of information pertaining to web design and coding. These abilities and resources will really enhance my next website. 

I am very proud of my Hoax website because I was able to efficiently and effectively display information that may be useful for others. 


Tuesday, November 11, 2014

Red Apple Shadow

In order to extract the apple from the original image, I used the Quick Selection tool. I drew an outline around the apple and then I refined the edges. By refining the edges, I eliminated the possibility of a pixel fringe. A realistic shadow was created when I used the free transform tool to create the shape of the apple. Then I used the black-to-white gradient on the apple shape. After adding the gradient to the apple, I adjusted the opacity to make the shadow more realistic.

Friday, November 7, 2014

Frozen Text

I did a firefly/Frozen text tutorial in Photoshop. The tutorial for this was very easy to follow. I made a brush using the brush tool in Photoshop. Then I downloaded the font. After typing my name using the font, I applied the brush to it. I'm really happy with how this project turned out!
Tutorial:
http://textuts.com/simple-fireflies-text-effect/

Land of the Unknown


How?

I created the Flying Mountain Tutorial in Photoshop. In addition to the rock, I added a moon and butterfly. I learned that in Photoshop you are able to edit an image in a separate file and drag it into another file to create one picture.

With?

This project was very layer heavy. Several layers were altered and merged together throughout the process. A layer mask was used to merge the desaturated layer. The content aware tool allowed me to select part of the sky and bring it forward to make it look like the cloud is in front of the flying rock. The quick select tool allowed me to select only part of an image. Surprisingly, the rock in this photo came from an image of an island. The blending mode tool was used to tone down the vibrance of the bright sky. This gave the picture an eerier effect. The refine edge tool was used to soften the edges of the images. The Hue and Saturation tool allowed me to tone down the vibrance of the image. 

Why?

Before making this project, I knew that I wanted to make it very mystical and mysterious. I think that the moon and butterfly really add to this effect. I resized the size of the butterfly to really make it stand out. I learned how to use several mask layers to create the exact effect that I was aiming for. I also learned more about Photoshop and used several short cuts to make the process smoother and easier. I also used my classmates to help inspire my ideas. Next time, I would add a waterfall on the rock because I think that would add to the mystical touch. I would continue with the mystical theme because it really goes with the mystical theme. From this experience I will continue to use similar masking tools to enhance my projects.

Friday, October 31, 2014

Photoshop and Illustrator Sphere Tutorials

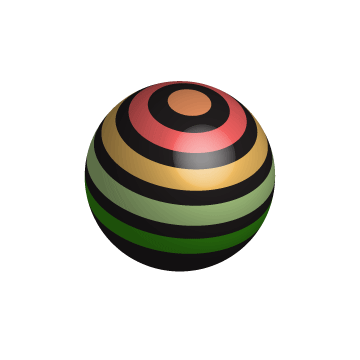
The sphere is a universal symbol with numerous meanings. It is two vertical lines bent to form one complete circle. A sphere symbolizes totality, wholeness, originality, and infinity. 

When I began this sphere project, I first practiced them in my sketchbook. After making the tutorials in both Illustrator and Photoshop, I saved the Illustrator file as a .ai and the Photoshop file  as a .psd. Overall, the tutorials in Illustrator were much easier. The Photoshop tutorials were completable, but they took a much longer time to complete. Also, in Illustrator I could change the color or shape of an object at any time. In Photoshop, I had to change the color or shape of the object in the beginning. In Illustrator, I could use less tools to complete the tutorial. In Photoshop, I had to use more tools to complete the tutorial.

I learned from the Photoshop tutorial how to use the smudge tool in order to give the sphere a fuzzy effect. I learned from the Illustrator tutorial how to create a glare on the sphere in order to make it more life like. 

I want to learn more about glares (light sources) and shadows in order to continue to make my creations life like. 

"A circle is never just a circle." ~Mrs. Lofquist

Links:
Illustrator:
http://pixelrockit.com/create-stylish-3d-shapes-with-adobe-illustrato  r/

Photoshop:
http://4-designer.com/2013/09/3-minutes-to-make-a-hairy-ball/#.VE5wCtykV4M


Thursday, October 23, 2014

Red Gradient Spheres

Photoshop and Illustrator are both Adobe programs, yet they are very different. Photoshop is a really good program to use when you are looking to edit photos. Hence the name, Photoshop. Illustrator has a lot of tools that help to add special details to your creations. You can illustrate and create unique products.


The first picture shown on the right is my red sphere from Photoshop. It is very grainy and almost has a textured look to it. The shadow added to the sphere is also not as life like as the shadow made in Illustrator. The light source (white dot) has a blurred effect to it. There also isn't much of a difference in the values of the colors.

My Illustrator sphere is much more life like. It also does not have the grainy or blurry textured look to it. The highlight on the red sphere looks as though there is a real light source shining on it. The values in the changes of the colors are also gradual and more accurate.

Saturday, October 4, 2014

Personal Logo


There are numerous ways that you can select the color, shape, and font, of your logo to tell your story using symbolism, psychology, and personality. You can choose warm or cool colors and hundreds of shapes, as well as fonts with various themes. My process went a lot like this: To  make my logo, I began with numerous sketches. After sketching, I went into Adobe Illustrator to create an artboard of my sketches. During our tutorial practices, I found one about making flowers. I remembered the steps of the tutorial that I had found earlier and was able to recreate it. I added reddish-pink colors and adjusted the opacity of all of the petals. I was really going for a simplistic look and I found that the flower really fit that desire. I learned how to use the direct crop tool (^) in order to make the petals pointy. I want to learn about more tools that can change the flower petal shapes in many different ways. I think I did a really good job picking out the colors of the flower and arranging them the way that I did. The only thing I would change would be the arrangement of the text on the flower. I want to make my name really pop and stand out. I need to work on picking out fonts that really fit the theme and emotion of the project that I am working on. Overall, I am really happy with how my logo turned out. It really represents me because I am simplistic, yet elegant. I love fun, bright colors, but in a sophisticated way.


Friday, October 3, 2014

Project 8 Website


This project was meant to teach us how to edit an image in Photoshop by adjusting the contrast, brightness, and texture of the picture, and then use it as a background  to make the text on our website easy to read. To begin with, we edited our pictures in Photoshop. We adjusted our skin tones. The pictures were taken with a white background so we had to prevent our pictures from looking washed out. Then we followed the outline of the picture to eliminate the excess space. 

After the picture was edited, we used an application called TextMate to design and create our website. For the background of our website, we used a "concrete" background image. Originally, this picture was very small and would show seams when it was enlarged. We edited it in Photoshop in order to make it seamless. I used Contrast, Alignment, Repetition, and Proximity (CARP) in the following ways: For contrast, I made my name a different color and font than the bulleted points. For Alignment, I put my name at the top of the page and had all of the bulleted points aligned to the left. Repetition was shown in the colors and alignment. As far as Proximity, my name was the biggest text on this page and the bulleted points are equally spaced out. 

The purpose of the wrapper div is to set the appropriate height and width of the page with text and images inside of it. This is shown by the red outline on my website. We included the CSS by creating a new style sheet. We linked this sheet to both our links and home page, so that the styles would apply to both.     

Throughout this project, I ran into problems with adding the images. I had to be really careful that I was typing in the correct name of the file, or else the image would not show. I think that I did a good job picking out attractive colors that go well together. I also think I did a good job editing my image in Photoshop. I would say that I still need to work on the Proximity portion of CARP. As shown in the photo above, there is a large gap of empty space between the last two bullet points. Next time, I will be more careful about the spacing on my website.        


Friday, September 26, 2014

Illustrator Name Tutorial

I did the smoke tutorial to create my name. It can be found on the following website: http://design.tutsplus.com/tutorials/how-to-create-smoky-brushes-and-type-in-illustrator-cs4--vector-3226.
The main thing I learned was how to create a smoke art brush. I feel as though I did a good job contrasting the size of the letters. I want to learn how to make the smoke look more realistic. I need to research different ways or patterns to follow with the art brush to make the smoke appear more life-like.

Tuesday, September 23, 2014

Google Logo


At first glance, the Google logo appears simple, however if one takes the time to look a little deeper, they will find that there is more than meets the eye. 

BackRub, the initial name of Google, began in 1996 as a research project at Stanford University. It was renamed Google because it was a misspelled form of googol. Googol stands for a 1 followed by 100 zeros. 

Ruth Kedar was the logo designer who created the logo that is shown on the Google site today. She formed the Catull font. It is simple and not bulky. The colors chosen for the logo are arranged in this order: blue, red, yellow, blue, green, red. Notice that there is a pattern of Primary Colors (blue, red, yellow, blue) followed by one Secondary Color (green). This made them stand out and showed the Google doesn't play by the rules.


Thursday, September 11, 2014

Anatomy and Personality of Pistilli-Roman Font


My personality matches the Pistilli- Roman text. We are both emotional, assertive, traditional, 
and disciplined. 


I am not strict, I make decisions based on my emotions. I am assertive; if I set a goal, I will achieve it. I prefer original and traditional ways and I am very hardworking. I labeled the anatomy of the text in the photo above. 

Friday, August 29, 2014

Illustrator Objects


Pencil Practice 1
   For my first project in Illustrator, I created a pencil and a pencil can. I used the rectangle, polygon, and circle tools to create the pencil. For the squiggle line, I used the pencil tool. The can was the biggest challenge. I used the elliptical tool to create the top and bottom the cylinder and then used the line tool to draw the sides. Lastly, I added color to the pencil and can.  
            Pencil Practice 2
    My second project was to create a another pencil and can. However, this time I had to create my project without step-by-step instructions. I followed the same process written in the paragraph above. The only differences in this project were the designs and colors of the pencil and can. Instead of the squiggle line, I used the pencil tool to write my name. The biggest challenge was positioning my name so that it looked realistic.  
        Complementary Objects
    For the third and final project I created in Illustrator this week, I designed two complementary objects. In my case, I created a tennis racquet and tennis ball because tennis is my favorite sport. The elliptical, polygon, line, text, grid, and arc tools were the resources that I used. Creating the strings of the racquet was the most difficult part. 

      Illustrator- Three Big Take-a-ways: I learned how to...
1. Fill in organic shapes.
2. Use the Clipping Mask.
3. Use guidelines in order to proportionately line up shapes.


Friday, August 22, 2014

What is Graphic Design?

  Graphic Design is much more than an art category. Its meaning and importance to our society go far beyond that. In every direction you look, you will find Graphic Design because there are many different styles of it. This span includes anything from magazines and book covers to food labels and landmarks.


   Graphic Design conveys a message and creates an effect. It is an art utilizing visual communication. While a majority of Graphic Design includes images and typography,drawn, painted, or photographed images are also considered Graphic Design. It is a perfect combination of art and technology.

   Along with being creative, Graphic Designers must have a solid understanding of color theory and typography They know that each of their creations will be different; some will be elegant and breath-taking, while others will be quirky and witty. Ultimately, Graphic Design is a "language for living." It enhances our daily lives by creating special moments. Without it, our world would not be the same.


Adobe Illustrator Color Wheel

    The Color Wheel Project required the use of many tools in Adobe Illustrator. To make all of the shapes, I used the Rectangle Tool. First, I made one large circle. Next, I made two large triangles and adjusted them inside the circle to create a star. I changed the stroke of the top triangle to create the dashed line. 
I then added the yellow, blue, and red circles to represent the Primary colors. To represent the Secondary colors, I added green, purple, and orange squares. After adding the Secondary colors, I added the Tertiary colors. They are represented on the color wheel by the triangles. Finally, I used the Text Tool to add a Primary, Secondary, or Tertiary label next to the appropriate shapes.